Using Caret for fMRI Visualization
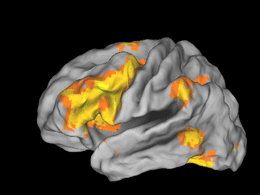 Caret is an incredibly useful program for the calculation and visualization of brain data. Like most incredibly useful programs it is also quite complex and a bit daunting to approach. While looking at three-views is a staple of fMRI research, sometimes it is easier to get the ‘big picture’ from a cortical surface rendering. I have had several requests for a basic fMRI->Caret tutorial over the last few months and I have finally gotten around to writing it. I make no guarantees that this is the most efficient or correct process, but it is how I was trained by an expert in Caret.
Mapping Contrasts to Inflated Surfaces in Caret:
1. Download Caret. Go to the following address to get started:
http://brainvis.wustl.edu/wiki/index.php/Caret:Download
You will have to go through a registration process, after which you can access the files to download the Caret application.
2. Download the following tutorial dataset.
Human.PALS_B12.BOTH.TEMPLATE-for-fMRI-MAPPING.73730
from the following address:
http://sumsdb.wustl.edu/sums/directory.do?dir_id=6585200
This is a series of template files and information for the mapping of spatially normalized fMRI data onto an inflated cortical surface.
3. Decompress the tutorial dataset and put it in a safe place on your computer. Whenever you want to do a Caret mapping make a COPY of the template and use the copy. Otherwise your template will be littered with the contrasts of a dozen different projects (trust me).
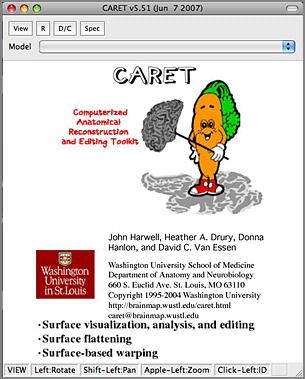
4. Open the Caret application. It should look something like this:
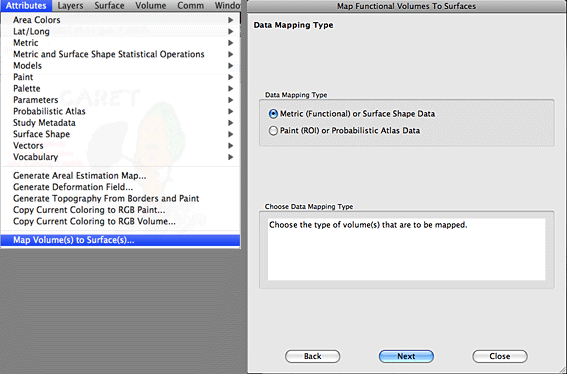
5. Under the Attributes menu at the top of the screen select ‘Map Volumes to Surfaces’. A window will appear asking you what kind of data mapping you wish to perform. Make sure that ‘Metric’ is selected and then click on the Next button.
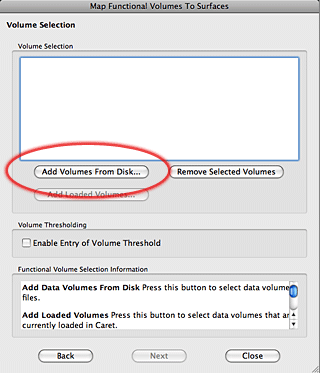
6. The next window that appears is where we select our SPM volumes for mapping. These are usually SPM t-maps that you want to represent on an inflated cortical surface. Select the ‘Add Volumes From Disk’ button and add the Analyze or Nifti volume for mapping. You can add as many volumes as you wish. When you are done click on the Next button.
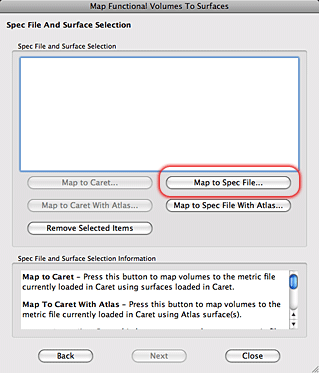
7. The next window is where we tell Caret what files to use for the mapping and where to store the results. While you can load a spec file into Caret and then ‘Map to Caret’, I usually just map it directly into the Spec file. Click on ‘Map to Spec File’ button, which will bring up a new selection window.
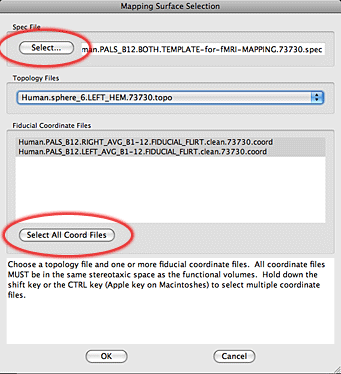
8. In the new Mapping Surface Selection window click on ‘Select’ and navigate to the template directory. The spec file to use is in the MAPPING_PROCEDURES folder. After you select the spec file you will see that the Spec File, Topology Files, and Fiducial Coordinate Files fields are filled with information. Click on the ‘Select All Coord’ files and hit the OK button.
9. When the Mapping Surface Selection window has closed you will be kicked back to the Surface Selection Screen. Hit the Next button.
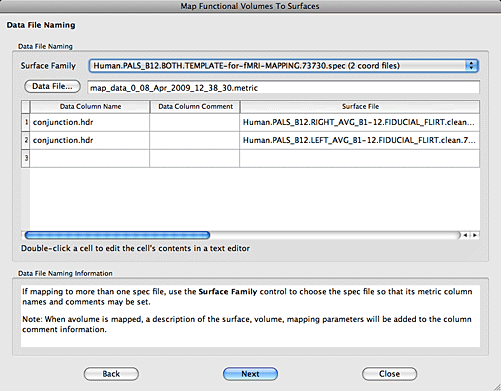
10. The next window that appears allows you to edit the names for each volumes as they will appear in Caret later. Edit each Data Column Name to be a good identifier, making sure to include something to discriminate left from right. If you are curious whether a row represents the left hemisphere or right hemisphere mapping just scroll to the right and look at the surface file name. When you are done hit the Next button.
11. In the next window you will select the mapping algorithm. ‘Enclosing Voxel’ is usually sufficient, but you can try others if you wish. When you are don hit the Next button.
12. At this point a progress bar will appear and Caret will compute the volume-to-surface mappings. Depending on the speed of your computer and the number of volumes to map this might take a few minutes. When Caret is done a processing summary will appear. Make sure everything is in order and hit the Finish button.
Viewing the results:
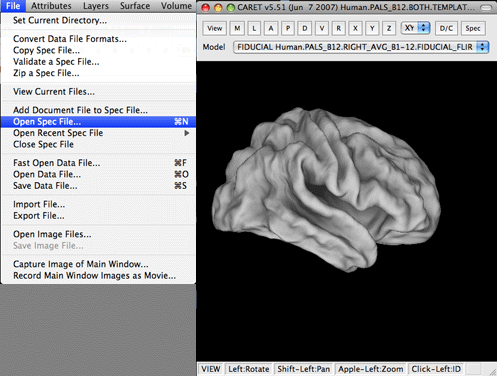
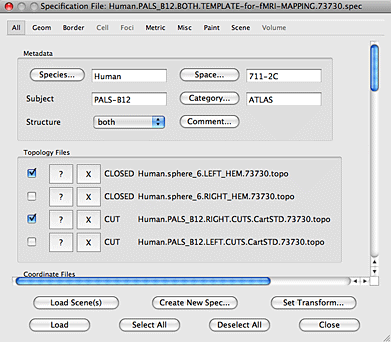
1. Open Caret and select ‘Open Spec File’ from the File menu. Navigate to the spec file that you used in the mapping procedures above and hit Open.
2. A window will appear that allows you to change and select a large number of parameters for loading the spec file. For brevity I always use the Select All button followed by the Load button.
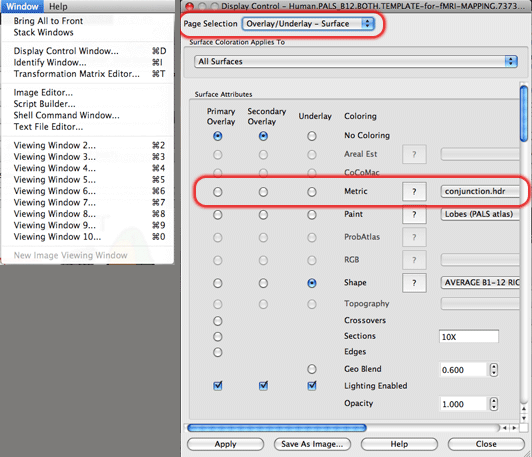
3. An inflated brain will appear in the Caret window, but none of your volume information will appear. Select ‘Display Control Window’ from the Window menu at the top of the screen. This is where you can tell Caret what you want to display in the main viewing window.
4. In the Display Control window that appears there is a drop-down menu called ‘Page Selection’ at the top. Make sure that ‘Overlay/Underlay – Surface’ is selected. Now, there is a grid of radio buttons below called Surface Attributes. Make the row that specifies ‘Metric’ coloring into the primary overlay by clicking on the radio button to the far left of the word Metric. On the drop-down menu to the right of the word Metric make sure that you have the right contrast and hemisphere specified for what you want to display.
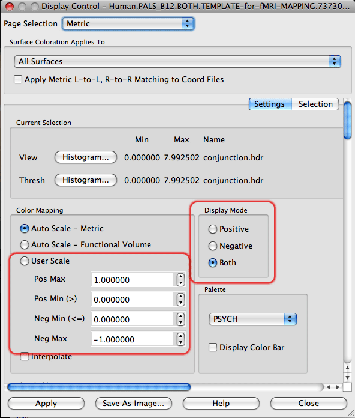
5. There may or may not be some coloring on your inflated brain at this point, but odds are such that it isn’t what you want to display. Under the Page Selection drop-down menu at the top of the Display Control window make sure that ‘Metric’ is selected. This will enable the specification of what t-values you want to display. Select whether you want positive values, negative values, or both under the Display Mode section of the screen. Next, select ‘User Scale’ in the Color Mapping section and define what t-values to use. At this point I usually go back to SPM to see what the threshold t-value was for the study and input that value. You might have to play around with the maximum value a bit depending on the distribution of your voxel values. Finally, select the checkbox for ‘Display Color Bar’ so you can let everyone know what your threshold criteria were.
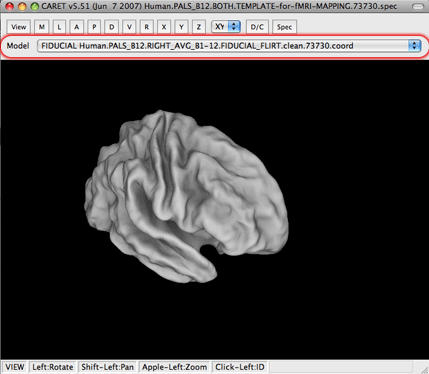
6. That should, hopefully, be it! You should have an inflated surface in your main viewing window with your t-contrasts mapped on.

7. For different views and opposite hemispheres make a new selection under the ‘Model’ drop-down menu in the main viewer screen. If you change hemispheres you must also change what metric file you are using on the ‘Overlay/Underlay – Surface’ Display Control window panel.
A Few Other Hints:
+ Depending on the location of your clusters they may show up as larger or smaller on the Caret surface. For instance, I had a very nice IPS cluster that was huge in the 3D volume but barely showed up on the Caret brain. To my knowledge there isn’t much you can do. My strategy is to show a Caret brain and then subfigures with axial slices so you can see another representation of the results.
+ The best way to get Caret to spit out image files is to select the ‘Capture Image of Main Window’ item under the file menu. You can either output an image of the main window our you can output an array of standard views automatically. Very useful.
+ ALWAYS make sure that you have the correct hemisphere selected under the Model menu in the main viewer and under the Metric file-selection on the ‘Overlay/Underlay – Surface’ Display Control window panel. Don’t get mixed up – it is easy to do.

5 Responses to “Using Caret for fMRI Visualization”
YSL - April 9th, 2009
Hey man,
what a great tutorial!!
Thanks for sharing your knowledge~
Best,
YSL
sawfoot - September 29th, 2011
Thanks for the tutorial, it was very helpful (and still works in 2011!).
evelyne - August 1st, 2012
Hi,
Can anyone help me with the working of CARET. I have already done a meta-analysis so I have all my coordinates in a text document. Can anyone tell me how to put in CARET?
best
Lydovec - August 2nd, 2012
How great this tutorial!
May I translate it into Chinese version and share in my blog?
Thank you!
Lyd
Effie - April 5th, 2015
Can you share the processing steps of adding a paint file? Thank you very much!
Leave a Reply
You must be logged in to post a comment.